
3D Product Visualizer: 5 Stages of Its Creation
3D product visualizer is an innovative digital tool that helps ecommerce businesses increase conversion, lower cart abandonment rate, and boost sales. It is an application embedded in a brand’s website that allows customers to design goods according to their preferences. This way, a 3D configurator allows manufacturers to keep up with the growing trend towards customization.
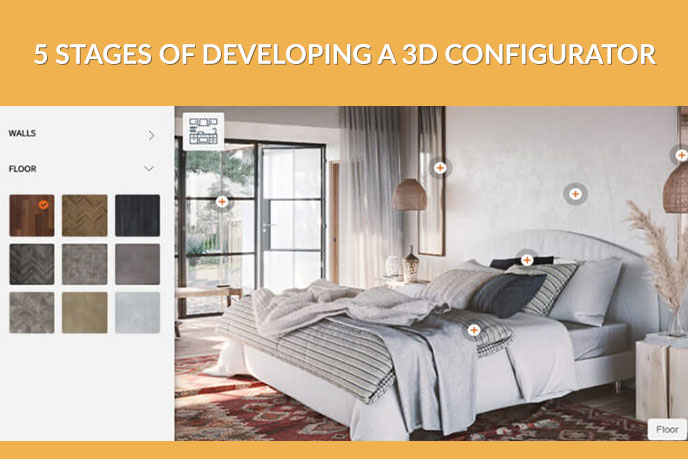
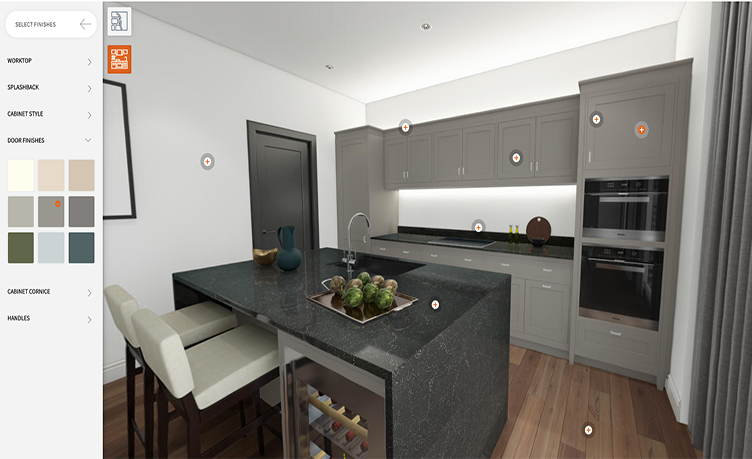
So, how does it function? The work of a 3D visualizer is based on the ‘sandwich’ principle. There is a basic image that shows up when a user starts a configurator and many ‘option’ visuals that serve as ‘masks’ of the customizable features. When a prospect is using a 3D visualizer, they see a realistic 3D model of a thing they’d like to buy and a dashboard that enables changing characteristics of the item. Usually, it’s possible to pick colors, add and remove particular details, and select different materials. This way, a prospect can design a product that perfectly meets their tastes and needs.
Such a tool is definitely an asset to any ecommerce brand. So, how can a manufacturer get a 3D product configurator? The first step is contacting a professional 3D visualization studio. But what comes next? What information a manufacturer should provide to a CGI studio? How long will it take to have a 3D configurator made and how exactly is it created? Join us to learn everything you need to know about the creation of a 3D product visualizer!
Stage #1. Filling in the project brief

UFO3D studio has a developed core module of a 3D product visualizer — an application written on VueJS. Depending on a particular client’s needs, the CGI company re-designs the interface and adds needed functions to this base. For the 3D professionals to know exactly what needs to be done, a manufacturer should submit a brief with all the details about the future 3D visualizer. So, what information should it provide? Let’s see.
First of all, it’s needed to specify a platform used by a brand’s website. It can be WordPress, Shopify, etc. Also, the client should list requirements for the functions of a visualizer and clarify the goals they’re going to use it for, i.e. sales, showcasing products, etc. It’s needed to specify if a company needs a configurator with a static image or a 360-degree view. If there’s a reference to a visualizer that a client likes, it’s a wise move to give a link to it as well.
It’s also needed to list products that will be showcased in a visualizer. It’s required to specify how customizable they are and how many options they have. Also, it’s important to mention if a manufacturer already has 3D models of the products or not. It’s also vital to specify requirements about the background. The manufacturer has to state whether it should be white, or feature an interior or exterior scene and whether this scene needs to be customizable. If the answer to the last question is positive, a client should specify how many scenes a configurator has to include. After getting all this information, a 3D rendering studio can start working on a 3D product visualizer.
Stage #2. Discussing details and setting deadlines

After a brief is submitted, a CGI team reviews it and checks if all the necessary details are included. If something is missing in the project outline, they contact a client and request additional information.
Also, at this stage, the CGI studio sets up a video meeting with their customer to discuss the future 3D product visualizer in more detail. During the discussion, both sides make sure they are on the same page about how they see the final result. Also, they clarify project objectives and set the next stage deadlines.
Stage #3. Core development, 3D modeling, and rendering

At this stage, a CGI team starts adjusting a 3D product visualizer specifically to a client’s needs. They develop and add requested features to the configurator, work on basic images, and create 3D models of a product. Also, they adapt the visualizer for the brand’s website.
The UFO3D studio’s specialists have experience with 3D configurator development projects. That is why the whole process goes smoothly, within standard workflow and approval cycle. As a result, a core for the visualizer as well as 3D models and scenes for it are always ready by the set deadline. After that, the team proceeds to the next stage of work.
Stage #4. Interface & options development

The next step that a CGI team takes is developing a sketch of a 3D product visualizer interface and approving it with a manufacturer. They won’t proceed without a client’s approval because the digital tool has to meet the project’s expectations, goals, and fit the website’s design.
After that, a 3D modeling specialist creates option images for each product and scene. For this, they have to render many images, sometimes thousands of them. This makes this stage the most laborious. 3D artists have to follow certain requirements for each image and make sure all the textures look photorealistic. After all the options are designed and approved by the client, the work is almost over. But there is still one step left to take.
Stage #5. Checking the final result
It’s a final step when a 3D configurator is almost ready to be put into operation. To ensure that everything is ok, a CGI team runs a brand-new 3D product visualizer application on a client’s website. They have to check if it functions correctly, and also test and optimize it if needed. Finally, after all these check-ups, a 3D configurator is ready for work.
Creating a 3D product visualizer takes from 30 to 90 business days. The exact timing depends on the complexity of a project. For example, it takes 30 days to develop an easy static WordPress configurator. While designing a 360-degree visualizer will take about 60 days.
The creation of a 3D configurator consists of 5 stages. A client fills in a brief and then discusses details of the project at an online meeting with a CGI team. Then 3D artists develop a core and work on basic and option images. After that, a manufacturer reviews and approves interface and options of a 3D visualizer. And, finally, after a CGI studio team checks all the functions, the digital asset can be launched.
Want to get a high-quality 3D visualizer that will boost your brand’s sales? Contact UFO3D for professional 3D modeling services and achieve just that!

Catherine Paul
Content Writer, Editor
Catherine is a content writer and editor. In her articles, she explains how CGI is transforming the world of architecture and design. Outside of office, she enjoys yoga, travelling, and watching horrors.
Let us know if you’ve got an interesting project and want to work together!